Make an Ambient Loop in Bitwig Studio Using Only Stock Devices
Learn how to build a full ambient loop in Bitwig Studio using only Bitwig's own instruments and effects. No paid plug-ins needed. We create three layers — a soft pad, a low drone, and a texture pluck — then add chorus, delay, and reverb.

Ambient music doesn't need a huge plug-in library. In this tutorial, we're going to build a complete ambient loop in Bitwig Studio using only what comes with Bitwig out of the box — no paid synths, no third-party effects.
We'll create three layers: a soft pad, a low drone, and a quiet texture/pluck sound. Then we'll add movement, delay, and reverb to make the loop feel wide and atmospheric. If you're new to Bitwig, don't worry — this tutorial is built for beginners and every step is explained from scratch.
🎥 Watch the video version of this tutorial on YouTube: Make an Ambient Loop in Bitwig Studio Using Only Stock Devices
Step 1 — Create the Pad Track and Load Polymer
Create a new instrument track in Bitwig and name it Pad. Load Polymer as the instrument. Polymer is Bitwig's own hybrid synthesizer — it combines wavetable, FM, and subtractive synthesis in one plugin, and it's the only synth we'll need for this entire tutorial.
Step 2 — Tempo and Project Setup
Set the project key to A Minor in Bitwig's header bar. This tells Bitwig which scale you're working in and makes drawing chords much easier later on.
Set the tempo to 75 BPM. This slow, deliberate pace gives your pads room to breathe and your modulations time to unfold — the heartbeat of ambient music.
Create an 8-bar MIDI clip on the Pad track. This is the canvas for your chord progression.
Step 3 — Shape the Pad: Oscillator
Inside Polymer, go to the oscillator section. Switch the sound source to Wavetable mode, then browse the factory wavetable list and pick something smooth and harmonic. There's no single right choice here — trust your ears and find something that feels musical in A Minor.
Bitwig ships with a generous collection of factory wavetables. You can also browse the Bitwig user community on KVR Audio for free wavetable packs that work inside Polymer.

Step 4 — Shape the Pad: Filter and Envelope
Filter: Select the Sallen-Key filter and choose Low Pass 4. Lower the cutoff slightly to soften the sound and remove harsh upper frequencies. The Sallen-Key is a classic analog-style filter design — it rolls off smoothly and musically rather than aggressively.
ADSR Envelope:
- Set the Attack to around 3 seconds — this slow fade-in is what makes it a pad rather than a stab.
- Switch to Digital mode, then adjust the attack curve for an even smoother fade-in.
- Adjust the Decay, Sustain, and Release to taste. Aim for a high sustain and a long release so notes dissolve gently rather than cutting off.
Sub Oscillator: Reduce the sub oscillator volume slightly to tame the low-frequency spectrum. We're saving that bass space for the drone layer.
Step 5 — Add Modulation
To give the pad an evolving, changing feel, we'll modulate the filter cutoff over time.
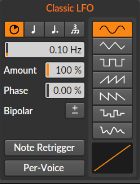
Inside Polymer, create a new modulation source and select Classic LFO. Set the frequency to 0.1 Hz — very slow and subtle. Assign the LFO to the filter cutoff, then switch it to unipolar mode (the +/− button) so the filter opens gradually upward rather than sweeping both ways.
The result is a pad whose harmonic texture shifts slowly — like light changing in a room. This is one of the most fundamental techniques in ambient sound design.
Step 6 — Add Unison for Width and Richness
Go to Polymer's Unison Settings. Set voices to 5 and dial in a small amount of Detune. Five slightly detuned voices spread across the stereo field gives you that characteristic shimmer and width of a great pad. Keep the detune subtle — a little goes a long way.
Step 7 — Draw the Chord Progression
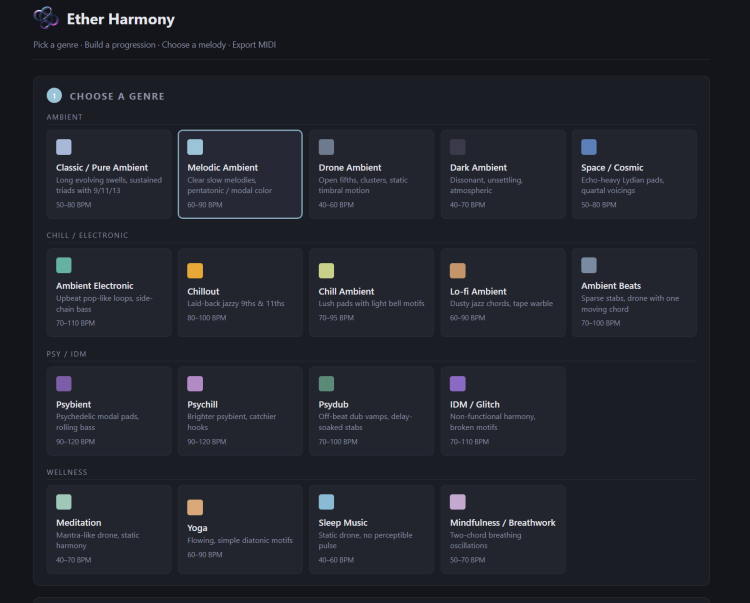
Open the 8-bar MIDI clip and draw in your chord progression in A Minor. In this tutorial we used Ether Harmony to generate the chords quickly — it's a chord generation tool designed specifically for ambient and atmospheric music, and it makes finding open, well-voiced progressions fast and intuitive.
If you're drawing chords manually in Bitwig's MIDI editor, go for spread, open voicings and let notes ring for 2–4 bars at a time. Overlap them so they blur into each other. Think of it as painting with harmony rather than writing a melody.
Step 8 — Add Chorus, Delay, and Reverb to the Pad
Chorus+ — Add Bitwig's stock Chorus+ device to widen the sound and add gentle movement. Chorus works by layering slightly pitch-shifted and time-delayed copies of the signal — it's one of the fastest ways to make a mono pad feel wide and alive.
Delay+ (Ping Pong) — Add Delay+ in ping pong mode. Ping pong delay bounces echoes left and right across the stereo field, which is perfect for ambient music. Adjust the time and feedback until the echoes feel like part of the atmosphere rather than a separate effect.
Reverb (Hall) — Add Bitwig's Reverb and switch to Hall mode. Increase the reverb time and raise the high-band reverb factor. Adjust the mix until the pad feels like it exists in a real, expansive space.
At this point your pad layer is set. Let it loop and have a listen before moving on.
Step 9 — Create the Drone Layer
Create a new track and name it Drone. Copy the MIDI clip from the Pad track to this new track — we'll use the same chord notes for the bass. Add a new instance of Polymer.
Shape the drone sound:
- Select the Sawtooth oscillator and tweak the Shape parameter slightly.
- Lower the octave to push the sound into deeper bass territory.
- In the FEG (Filter Envelope Generator) section, increase the attack so the filter opens slowly — the drone should ease in, not hit instantly. The FEG controls how the filter cutoff moves over time when a note triggers, independently of the main amplitude envelope.
- Change the filter type and lower the cutoff for a softer, more subdued bass sound. The drone should be felt more than heard.
- Add an EQ device and boost the lower frequencies to give the sound more depth and body.
Step 10 — Add the Texture / Pluck Layer
Create one more track — name it Structure or Pluck. Copy the MIDI clip from the Pad track here too, then add another instance of Polymer.
Shape the pluck:
- Select the Sawtooth oscillator and adjust the Shape parameter.
- Pull the Sub oscillator volume all the way down — no low harmonics needed here.
- Set a short Attack and short Sustain in the ADSR. This sound should be short and punchy.
- In the FEG, increase the attack to create filter movement on each triggered note. Tweak the FEG Amount to control how much the filter opens per hit.
Set up the Arpeggiator:
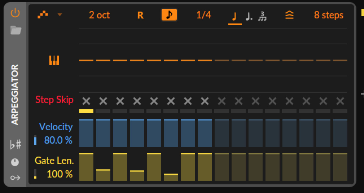
Bitwig's built-in Arpeggiator is a powerful generative tool that turns held chords into moving patterns. Set it up like this:
- Steps: 8 (default)
- Octaves: 2
- Rate: Quarter notes
- Gate: Randomized — so notes vary in length and feel organic
- Pattern: Random — for generative, non-repeating sequences
Add effects:
- Delay+ (Ping Pong) — increase the mix so the delay trail sits clearly in the mix.
- Reverb (Hall mode) — increase the reverb time, raise the high-band factor, and adjust the mix to place the plucks in the same space as the pad.
Step 11 — Balance and Final Playback
You now have all three layers. Press play and let the loop run.
A rough starting balance:
- Pad — most prominent, the harmonic body of the loop
- Drone — underneath, more felt than heard
- Pluck — quietest, a subtle textural presence
Let the loop run for several full cycles before making any changes. Ambient music reveals its problems over time — a reverb building up, an arpeggio feeling predictable, a drone frequency becoming fatiguing. Listen, then adjust in small steps.
What You've Built
A complete ambient loop using nothing but Bitwig's own tools:
- Polymer Pad — Wavetable oscillator, Sallen-Key LP4 filter, 3-second attack, 0.1 Hz LFO on filter cutoff, 5-voice unison → Chorus+, Ping Pong Delay, Hall Reverb
- Polymer Drone — Sawtooth oscillator, lower octave, slow FEG attack, low cutoff, EQ bass boost
- Polymer Pluck — Sawtooth, short ADSR, FEG modulation, 8-step random arpeggiator → Ping Pong Delay, Hall Reverb
All made with only Bitwig's native devices.
Where to Go Next
Try changing the arpeggiator settings, adding more LFO modulation inside Polymer, or swapping to a different wavetable on the pad. When the loop feels right, start building an arrangement and turn it into a full track.
The formula: slow tempo + soft pad + long chords + gentle modulation + chorus, delay, reverb + drone + texture layer. That's your foundation for any ambient track.
🎹 Generate Better Chord Progressions with Ether Harmony
Throughout this tutorial we used Ether Harmony to create the chord progression — and it made the process a lot faster and more musical.
Ether Harmony is a chord generation tool built specifically for ambient and atmospheric music. Instead of guessing which chords sound good together, you get instant access to open, well-voiced progressions in any key — the kind of chords that actually work in ambient, cinematic, and lo-fi music.
What it does:
- Generates ambient chord progressions in any key and scale
- Outputs MIDI you can drag straight into Bitwig (or any DAW)
- Designed for producers who want great-sounding harmony without deep music theory knowledge
👉 Get Ether Harmony at shop.etherloops.com
If you're building ambient loops regularly, it's the fastest way to go from blank MIDI clip to a chord progression that actually sounds right — in seconds.
Want more Bitwig tutorials and ambient production guides? Subscribe to EtherLoops on YouTube and follow along.
#Bitwig #AmbientMusic #MusicProduction