How to Build a Lush Ambient Pad in Surge XT — Step-by-Step Sound Design Guide
Build a complete ambient pad in Surge XT from scratch — wavetable oscillator, unison, slow envelope, S-LFO modulation, and a strong effects chain. No prior Surge XT experience needed.

Surge XT is a free, open-source synthesizer with a depth that rivals expensive commercial instruments. Its oscillator engine covers everything from classic waveforms to wavetable and physical modeling synthesis, its modulation system gives you 12 LFOs and a flexible routing bar, and its effects block offers 16 slots loaded with reverbs, chorus, ensemble, and granular processing. For ambient music producers, this is a remarkably complete toolkit — at no cost. You can download Surge XT for free and run it as a VST3 or CLAP plugin inside Bitwig Studio 6.
In this guide, we'll build a complete ambient pad from an empty init patch. Every step uses exactly the labels you'll see in the Surge XT interface, so you can follow along directly.
Step 1 — Load an Init Patch
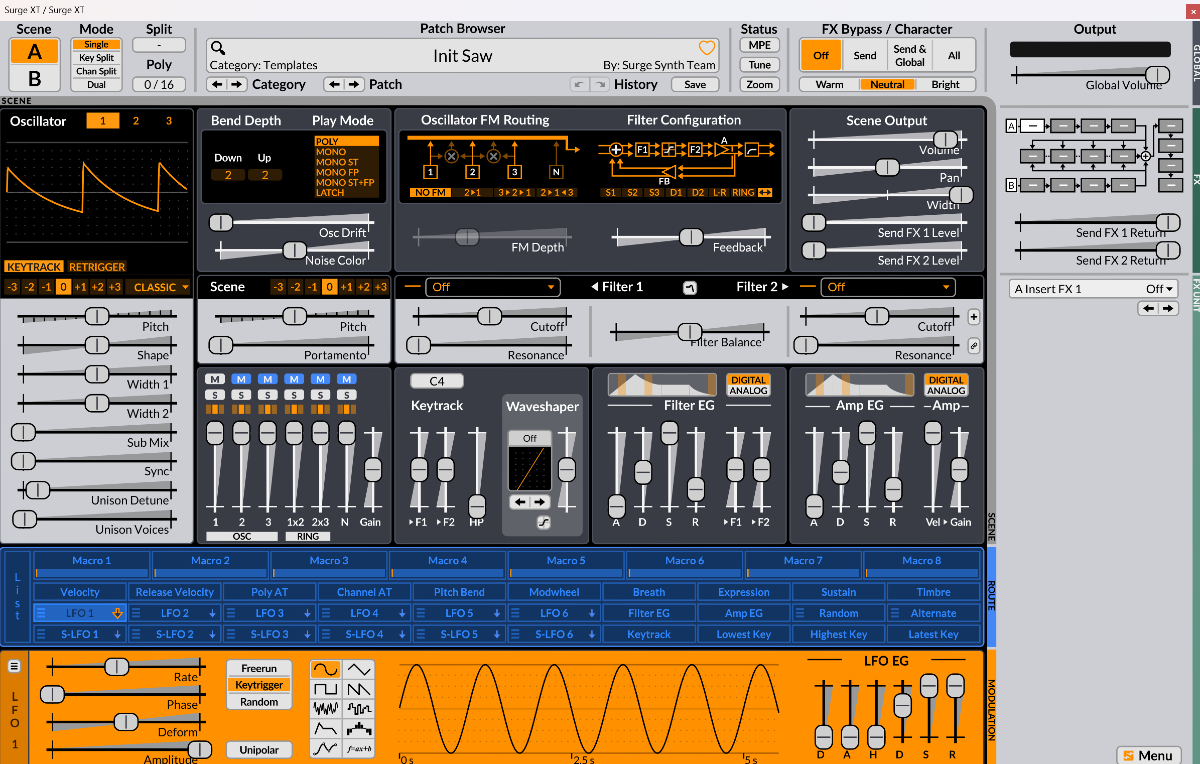
Open Surge XT in Bitwig Studio 6. Patch Browser: Click the Category and Patch arrow buttons to browse, or click the patch name area itself to open the full browser list. Navigate to Templates → Init Sine to load a clean starting point — a single Sine oscillator, no effects, neutral settings throughout.
In the top-left, confirm that Mode is set to Poly (visible in the Play Mode list, which shows POLY, MONO, MONO ST, MONO FP, MONO ST+FP, LATCH). Ambient pads need polyphony, so chords can sustain and overlap.
Step 2 — Choose Your Oscillator: Wavetable
The oscillator section is in the top-left, labeled Oscillator, with three numbered buttons (1, 2, 3) to select which oscillator you're editing. Make sure 1 is selected.
At the bottom-right of the oscillator area, you'll see a small dropdown currently showing WT — this is the oscillator algorithm selector. Click it, and you'll see the full list: Classic, Modern, Wavetable, Window, Sine, FM2, FM3, String, Twist, Alias, S&H Noise, Audio Input. Select Wavetable (shown as WT once selected).
Directly below the oscillator waveform display you'll see the wavetable name bar — in the screenshot it shows "VT Analog Hybrid 3", which is one of Surge XT's factory wavetables. Use the ◀ ▶ arrow buttons on either side of the name to browse through the factory library, or right-click the name to navigate by category. For ambient pads, look for wavetables with smooth, evolving harmonic character — the factory library is large and well-stocked. You can also download additional wavetables directly from the wavetable selection bar, or drag and drop Serum-compatible .wt files anywhere onto the Surge XT interface.
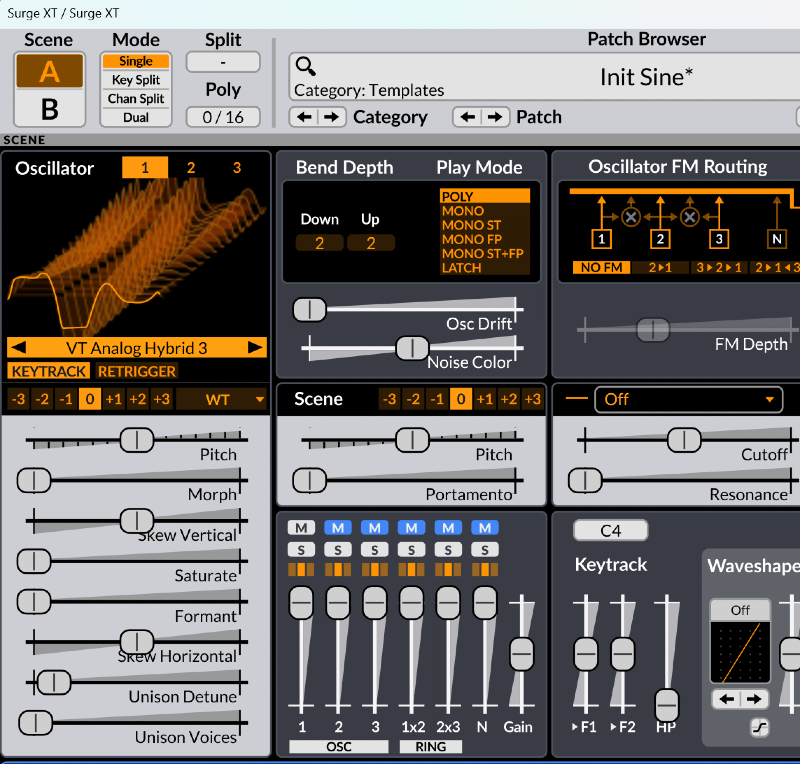
The oscillator parameters you'll see on the left side of the oscillator area are:
- Pitch — leave at 0
- Morph — this is the key parameter: it sweeps from the first wavetable frame (0%) to the last (100%). We'll modulate this with an S-LFO in Step 6.
- Skew Vertical, Saturate, Formant, Skew Horizontal — leave these at default for now
- Unison Detune and Unison Voices — covered in the next step
Also note the KEYTRACK and RETRIGGER buttons below the wavetable name. Leave KEYTRACK enabled so the oscillator tracks your MIDI notes across the keyboard. RETRIGGER controls whether each voice starts at the same phase — leaving it off gives a more natural, less digital onset between notes.
Step 3 — Add Unison for Thickness and Width
Still in the oscillator area, find the Unison Detune and Unison Voices sliders at the bottom of the parameter list.
- Unison Voices — stacks multiple copies of the oscillator at different pitches. The range is 1 (disabled) to 16. For pads, 5 to 7 voices give a full, rich sound without excessive CPU cost.
- Unison Detune — sets how far apart the voices are pitched, in cents (0–100 cents by default, extendable to 1200 cents via right-click). Start around 10–20 cents for a warm shimmer.
Now find the Osc Drift slider in the Scene controls area (the horizontal strip above the filter section, labeled Scene on the left). Enable it by clicking — this independently varies the pitch of all oscillators and their unison voices over time, adding an organic, analog-style instability that prevents the pad from sounding rigid and digital.
Step 4 — Filter Configuration and Cutoff
Move to the Sound Shaping section in the center of the interface. The first row shows the Filter Configuration diagram and buttons. You'll see a row of options: S1, S2, S3, D1, D2, L-R, RING, ↔
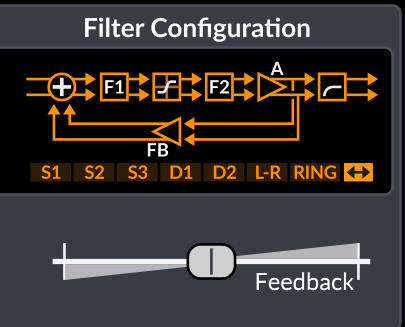
For ambient pads, two configurations are particularly useful:
- L-R (Stereo) — routes Filter 1 permanently to the left channel and Filter 2 to the right. The manual confirms this is one of only two configurations that output a true stereo signal.
- ↔ (Wide) — mirrors the S2 serial path but doubles it for a full stereo output. Left and Right mixer routes are hard-panned to their stereo positions.
Click ↔ (Wide) as your starting point for the widest stereo image.
Below the configuration selector is the Filter 1 section. The filter type dropdown currently shows LP 12 dB — this is a 12 dB/oct lowpass filter, which is a good starting point for pads. Leave it here. The Cutoff slider is labeled clearly; drag it to a warm mid-position (the tooltip shows the frequency in Hz as you drag). Keep Resonance low — just enough for character, not enough to peak.
In the Keytrack section below, you'll see sliders labeled ▶F1, ▶F2, and HP with a root note indicator showing C4. Drag the ▶F1 slider upward to around 50–70% — this makes Filter 1's cutoff rise with higher notes, keeping the pad's tonal character consistent across the keyboard.
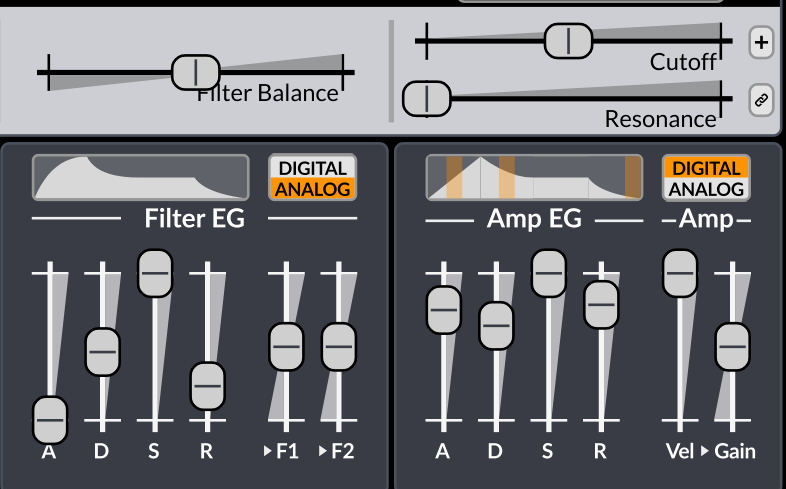
Step 5 — Shape the Amplitude Envelope
Find the Amp EG section — the rightmost envelope block, labeled Amp EG with –Amp– underneath. It has four sliders: A (Attack), D (Decay), S (Sustain), R (Release), plus a Vel ▶ Gain slider for velocity sensitivity.
Set these for an ambient pad:
- A (Attack) — drag high, to 3–6 seconds. This slow bloom is the defining character of a pad sound.
- D (Decay) — 1–2 seconds. After the attack peaks, the volume settles toward a sustained level.
- S (Sustain) — drag to maximum or near-maximum. The pad needs to hold its level.
- R (Release) — drag high, 4–8 seconds. This long tail lets chords blur softly after you release.
Now look at the small badge in the top-right corner of the Amp EG block — it shows DIGITAL / ANALOG. Click ANALOG. This switches the envelope curves from linear digital ramps to the curved, asymptotic response of analog envelope generators. The attack now breathes naturally into its peak rather than climbing in a straight line — a clearly audible improvement on pads.
You can also apply the same Analog mode to Filter EG (the envelope block to the left, labeled Filter EG), which controls how any filter modulation behaves over time.
Step 6 — Modulation: Making the Pad Evolve
Look at the routing bar — the blue horizontal strip across the middle of the interface labeled ROUTE on the right side. It contains all available modulation sources in rows: the top row has Macro 1–8, then voice properties (Velocity, Release Velocity, Poly AT, etc.), then LFO 1–6 and internal modulators, and finally the bottom row: S-LFO 1–6, Keytrack, Lowest Key, Highest Key, Latest Key.

Why S-LFO and not LFO? A voice LFO (LFO 1–6) runs independently per voice — in Poly mode, each new note gets its own LFO instance at a different phase. An S-LFO (Scene LFO) runs once for the whole scene, so all voices share the same modulation. For pad movement where the entire chord breathes together as one, S-LFO is correct.
Set up S-LFO 1: Click S-LFO 1 in the routing bar — the LFO editor at the bottom of the interface will update to show it (labeled S LFO 1 on the left side). You'll see the LFO parameters:
- Rate — drag this far left for a very slow cycle. Right-click and enable Tempo Sync to lock it to your DAW's BPM if preferred.
- Phase — leave at default.
- Deform — leave at 0 for a clean sine shape.
- Amplitude — leave at maximum.
For shape, click the sine wave icon in the shape selector (leftmost of the waveform icons). The LFO display will show a smooth sine wave.
For Trigger Mode, click Freerun — this keeps the LFO running continuously regardless of when notes are played, so the pad feels like it exists independently in the room rather than restarting with every key press.
Leave Unipolar off for now — a bipolar sine will sweep the modulation both above and below the base value, giving a natural breathing movement.
Now route it: Click S-LFO 1 in the routing bar a second time — it turns bright green (routing mode engaged). All modulatable parameters now show a blue depth slider over their normal slider.
- Drag the Morph blue slider on the oscillator to a small-to-moderate depth — the wavetable will sweep slowly through its frames as the LFO cycles.
- Drag the Cutoff blue slider on Filter 1 to a moderate depth — the filter will breathe open and closed gently.
Click S-LFO 1 once more to disengage routing mode.
Step 7 — The Effects Chain
The FX section is on the right side of the interface. At the top-right, you'll see the Output block with the effect routing diagram showing Scene A (top row) and Scene B (bottom row) chains, plus send and global slots.
The A Insert FX 1 dropdown (currently showing Off in the screenshot) is where you load effects for Scene A. Click it to open the effect picker and build this chain:
A Insert FX 1 — Ensemble or Chorus Load Ensemble or Chorus. Both are in the effects list. This adds gentle pitch modulation across the voices, widening the sound and adding a shimmer. Keep the rate slow and depth moderate.
A Insert FX 2 — Reverb 2 Surge XT has three reverb options: Reverb 1, Reverb 2, and Spring Reverb. Load Reverb 2 here. Set a long decay (8 seconds or more for deep ambient spaces) and add pre-delay — the gap before the reverb tail begins — to give the dry sound room before the space opens. Set Mix to around 40–50% as a starting point.
Step 8 — Save and Extend in Bitwig Studio 6
Save the patch in Surge XT with Ctrl/Cmd + S. Give it a descriptive name and it will be stored in your User Patches folder, accessible from the Patch Browser next time.
Back in Bitwig Studio 6, the patch becomes more powerful when combined with Bitwig's own modulation layer. Notice the Macro 1–8 sliders in the routing bar — each macro can be assigned to any routable parameter inside Surge XT. Add a LFO modulator device to the instrument rack in Bitwig and map it to a Surge XT macro, then inside Surge XT assign that macro to, for example, the Send FX 1 Level slider in the Scene Output section. This lets Bitwig drive long, slow send-level swells across song sections — macro-scale movement that Surge XT's own LFOs aren't designed for.
From here, explore freely: try the Window oscillator as a second layer on Oscillator 2 — it uses the same wavetable library but applies a windowing function (Triangle, Cosine, Sine, or six other shapes) for a softer, more rounded tone. Or use Surge XT's Dual scene mode to run Scene A and Scene B simultaneously with different patches, blending them via the Scene Output Volume sliders.