How to Make an Ambient Track from Scratch with Surge XT (Free VST Tutorial)
Build a complete ambient track from a blank project using free VSTs. A full step-by-step guide to layering pads, a bass drone, an arpeggiator, drums, and effects in A Minor with Surge XT, Bitwig Polymer, and Valhalla Supermassive.
Ambient music is all about atmosphere - slow-moving pads, deep drones, and just enough rhythmic movement to keep the listener drifting forward. In this tutorial, I'll walk you through building a complete ambient track from a blank project, layer by layer, using mostly free tools. By the end, you'll have a lush pad, a foundational bass drone, a shimmering high-tone pad, a plucky arpeggiator, drums, and a textured effects layer, all sitting in the key of A Minor.
Here's everything we'll build:
- A soft sustaining pad - the harmonic heart of the track (Surge XT)
- A deep bass drone - the foundation and weight (Surge XT)
- An atmospheric high-tone pad - shimmer and air (Surge XT)
- A plucky arpeggiator - rhythmic melodic movement (Bitwig Polymer)
- A drum sequence - energy and groove (XO)
- A squelch effects layer - texture and character
Tools you'll need
Almost everything here is free. Grab these before you start:
- Surge XT - the excellent free hybrid synthesizer we'll use for three of our layers.
- Valhalla Supermassive - a free, gorgeous reverb/delay plugin for spatial depth.
- Bitwig Studio (Polymer) - our DAW, and the Polymer synth for the arpeggiator.
- XLN Audio XO - the drum machine used for the rhythm (any drum machine or your own MIDI works too).
- Track Builder - a standalone web app for generating MIDI patterns. Download it here.
Prefer to watch instead? The full video walkthrough is here: watch the tutorial on YouTube.
Layer 1: The foundational soft pad (Surge XT)
Start from a completely fresh, empty project and insert your first instance of Surge XT. This pad is the harmonic bed the whole track sits on, so we want it thick, warm, and slowly evolving.
Oscillators
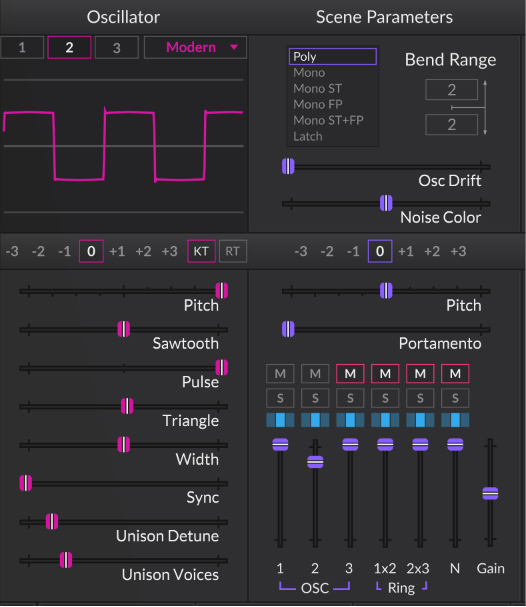
Build the pad from two oscillators, both set to Pulse waveforms. Pitch the second oscillator up by 7 semitones (a perfect fifth). That interval gives the pad a rich, harmonically interesting timbre that sits naturally in a minor key.
Next, increase the number of unison voices on both oscillators and fine-tune the detune amount. This is what turns two thin oscillators into a wide, lush pad - a little detune goes a long way, so dial it in by ear until it feels thick but not seasick.
Filter
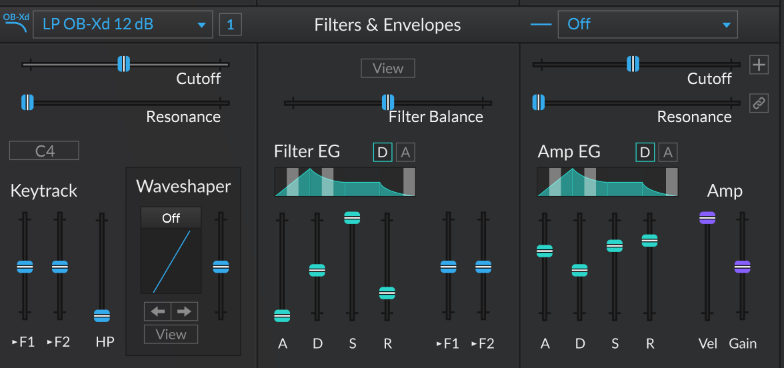
Apply a low-pass filter, and specifically choose the OB-XD low-pass. It faithfully emulates the legendary Oberheim OB-X hardware synth and brings a warm, classic analog character to the sound. Once the filter is in, go back and tweak the pulse width to dial in the exact pad texture you're after.
Movement with LFOs
A static pad is a boring pad. Assign LFO1 to modulate the filter cutoff to introduce gentle, evolving movement. Set the LFO to a slow rate and switch it to unipolar mode so the filter sweeps smoothly in one direction rather than oscillating up and down.
For a second dimension of motion, use LFO2 to modulate the pulse width of the first oscillator. Keep this rate slow too - the goal is a subtle, continuous timbral shift you feel more than hear.
Amplitude envelope
Shape the amp envelope for a classic pad response: a long attack so the sound swells in gradually, and an extended release so notes linger and fade naturally instead of cutting off abruptly.
Internal effects
Add a Chorus inside Surge and browse the factory presets until you find one that captures the atmospheric mood - chorus widens the pad and adds a gentle sense of motion.
External effects
Close the Surge editor and finish the pad with two external effects:
- Bitwig Delay Plus - a subtle ping-pong delay with low feedback, a balanced mix, and a high-pass filter to keep the low frequencies clear.
- Valhalla Supermassive - leave the default mode and dial the mix back to a subtle level. Just a hint of reverb adds space without washing out the pad.
Layer 2: The deep bass drone (Surge XT)
Insert a second instance of Surge XT for the drone. This is the weight and power of the track - the layer you feel in your chest.
Oscillators
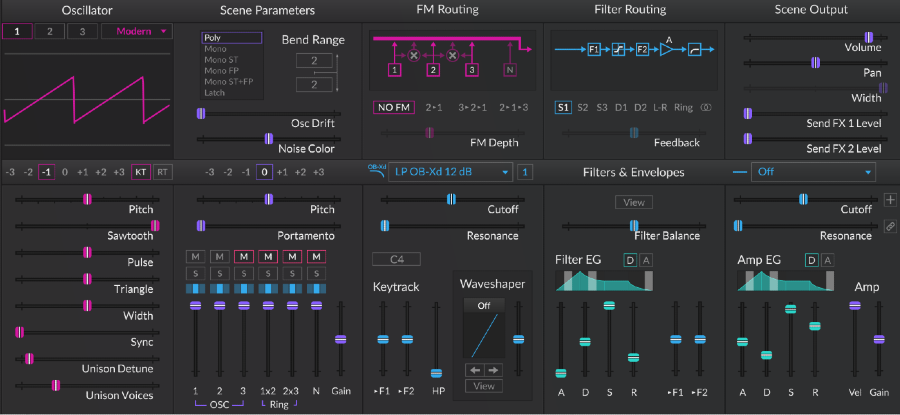
Use two oscillators, both set to the Modern Sawtooth waveform. Pitch the first oscillator one octave below the root, and drop the second oscillator two octaves below for maximum depth. The stacked octaves give the drone both fundamental power and body.
Filter and envelope
Apply the OB-XD low-pass filter again to sculpt and warm the tone. Then fine-tune the amplitude envelope to find the sweet spot for a soft, deep bass - smooth attack, long tail, nothing punchy or percussive.
Width and safety
Add more unison voices to both oscillators for a wider, more immersive drone. Finally, drop a peak limiter on the channel to manage overall gain and catch any occasional volume peaks - bass layers stacked in octaves can spike, so this keeps things safe.
Layer 3: The atmospheric high-tone pad (Surge XT)
Load a third instance of Surge XT for the shimmer up top. This layer adds air and ethereal character that floats above the pad and drone.
Oscillators
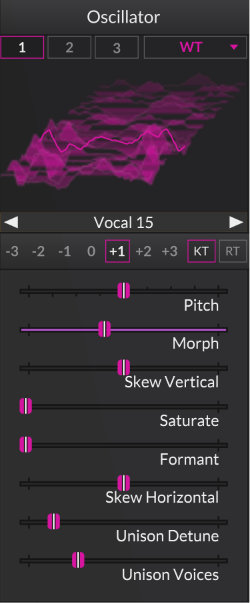
Set the first oscillator to the Wavetable sound source and pick a factory wavetable with bright, high-frequency waveforms for that shimmering quality. Add a second oscillator on Modern Sawtooth to layer in extra brightness and harmonic interest.
Movement
Assign LFO1 to modulate the wavetable morph slider and set a subtle rate. Morphing slowly through the wavetable creates a living, organic texture that never quite repeats.
Amplitude envelope
Give this pad a long attack so it swells in gradually, and a generous release so it lingers beautifully after notes end - the same slow, classic pad character as Layer 1, just brighter.
Effects
Inside Surge, add a Flanger and audition the factory presets for one that adds movement. Then finish with the same external chain as the other layers: Delay Plus set to a subtle ping-pong, plus Valhalla Supermassive for depth and spatial richness.
Organize and rename your tracks
Before moving to the musical side, rename all your tracks - Pad, Drone/Bass, High Pad, and so on. It's a small step, but a well-labeled project saves you a lot of confusion once the layers start stacking up.
Generating the MIDI with Track Builder
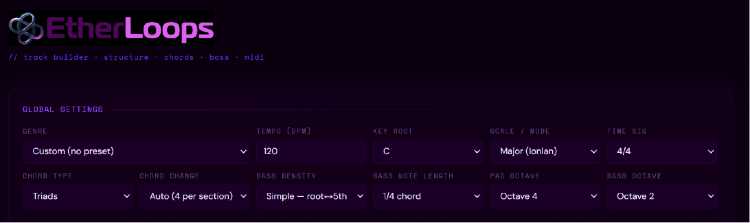
Now for the notes. Track Builder is a standalone web app that runs in any browser and generates MIDI patterns you can drag straight into your DAW.
Configure the musical settings that guide the generation: genre, tempo, root key, scale, chord type, and more. For this track we're working in A Minor. Track Builder shows you the generated chord progression, and from the bottom of the interface you can download the individual MIDI files for each layer.
Then head to your downloads folder and drag each generated MIDI file onto its corresponding track in the DAW.
Fine-tuning the notes
Once the MIDI is in, clean it up:
- Select notes and use Shift + Up / Shift + Down arrow keys to transpose by an octave and fit each part into the right range for its instrument.
- The bass notes in particular may sit too low - shift them up an octave to bring them into a usable range.
- Verify the key: open a MIDI clip and click the flat/sharp indicator to highlight all notes in the selected key in blue. Everything should light up as A Minor.
Layer 4: The plucky arpeggiator (Bitwig Polymer)
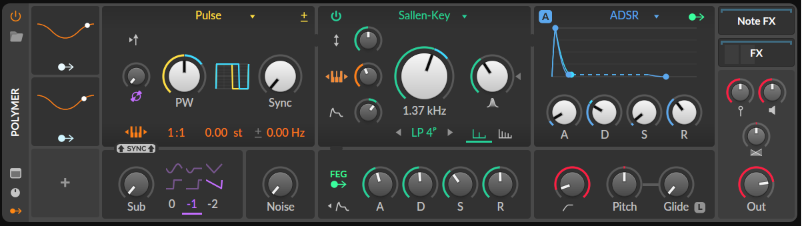
Time for the melodic movement. Load an instance of Polymer and select a Pulse waveform. Set a short attack and short decay to get a crisp, snappy pluck.
Reuse the chord progression
Rather than write new notes, copy the pad's chord progression to the arp track: click the pad MIDI clip, hold Ctrl (Cmd on Mac), and drag it onto the new track to duplicate the MIDI data.
Arpeggiator and modulation
Add the Arpeggiator device and set it to 8th notes for a quick, driving rhythmic pattern. Then bring the pluck to life with modulation:
- A slow, free-running LFO modulating the pulse width.
- A second LFO modulating the filter cutoff for dynamic timbral character.
- A Random modulator on the Arpeggiator, set to bar-based timing so it changes every two bars. Route it to the pattern change and also to the octave parameter for extra melodic variation.
Effects
Finish with a subtle ping-pong delay and Valhalla Supermassive reverb to give the arp space and movement.
Layer 5: The drums (XO)
Add rhythmic energy with the XO drum sequencer. XO is great for quickly exploring drum sounds and patterns, but this step is fully up to you - any drum machine, sequencer, or your own hand-programmed MIDI pattern will do the job. Keep it supportive and understated so it drives the track without overpowering the atmosphere.
Layer 6: The squelch effects layer
The final touch is a classic squelch sound - a moving, textured effect that adds character and life across the whole composition. Building the squelch is a mini-tutorial of its own; you'll find the full walkthrough here: how to design the squelch effect.
Wrapping up
And that's the whole track: three Surge XT layers for the harmonic core, a Polymer arpeggiator for melodic motion, XO for rhythm, and a squelch layer for texture - all glued together with tasteful delay and Valhalla Supermassive reverb, sitting comfortably in A Minor.
The real magic in ambient music is in the details: slow LFOs, long attack and release times, and just enough movement to keep everything breathing. Use this as a template, then swap sounds and settings to make it your own.
If you build something with this, I'd love to hear it. And if you found this useful, watch the full video tutorial and subscribe for more sound design walkthroughs. See you in the next one.