Generative Ambient Chords in Bitwig — Multi Note + Random Modulators Tutorial
Learn how to build a self-running ambient chord generator in Bitwig Studio using only stock devices — no music theory required. This step-by-step tutorial covers Multi Note, Random modulators, Key Filter+, and an auto-arpeggiated melody layer.

If you've ever wanted your ambient tracks to evolve and breathe on their own — chords shifting each loop subtly, a melody weaving in and out without you touching the keyboard — this tutorial is for you. We're going to build a completely self-running ambient chord generator in Bitwig Studio using nothing but stock devices. No third-party plugins, no music theory prerequisites.
By the end, you'll have:
- A generative pad that plays a different chord on every note trigger, always staying in key
- A second auto-arpeggiated melody layer derived automatically from those chords
- A modular, reusable system you can drop into any project
Let's get into it.
What You'll Need
- Bitwig Studio (any recent version)
- Devices used: Polymer, Multi Note, Key Filter+, Random modulator, Arpeggiator, Note Transpose, Chorus+, Convolution Reverb, Delay
That's it. Everything is included with Bitwig Studio out of the box.
Step 1 — Build the Ambient Pad Sound {#step-1}
Start by creating a new instrument track and loading up the Polymer synth.
For that classic ambient pad character, you want:
- Source: Set Polymer's oscillator to a Wavetable source. Browse the wavetable library and find something with movement — evolving, spectral, or pad-oriented wavetables work great here.
- Unison: Dial in the unison settings to spread the sound and give it width.
- Wavetable modulation: Add modulation to animate the wavetable position so the timbre slowly drifts over time.
- Amplitude envelope: Set a long attack and a generous release. This is the foundation of the ambient pad sound — notes bloom in slowly and linger after you release them.
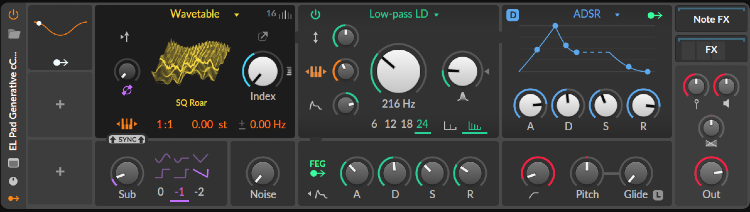
Add Effects Inside Polymer
Rather than chaining effects outside the synth, add them inside Polymer's FX section — this keeps the signal path clean:
- Chorus+ thickens and widens the pad considerably
- Convolution Reverb — places the sound in a space; long room or hall IRs work well
- Delay — adds depth and subtle echo tails
Take a moment to dial in the mix of each. The goal is a lush, spacious sound that doesn't dominate the room — it should sit and breathe.
Step 2 — Set Up the Multi Note Effect {#step-2}
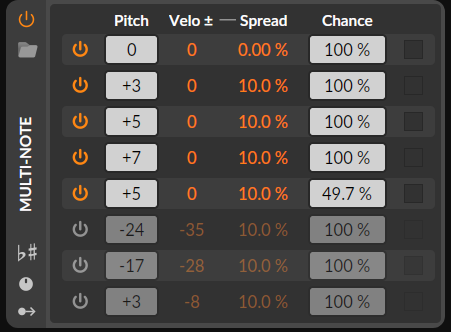
Now for the core of the system: the Multi Note device. Add it to the note effects chain of your pad track (before Polymer in the signal flow).
Multi Note takes a single incoming note and fans it out into multiple notes simultaneously — perfect for building chords from a single trigger.
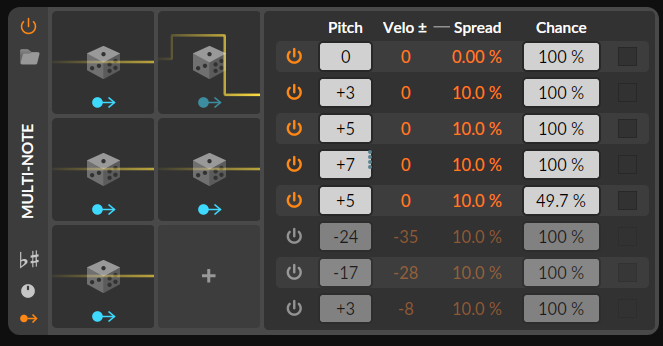
- Set note count to 5 — we'll be building 5-note chords.
- Set the velocity for each note slot to your preferred default (around 80–100 works well for pads).
- Set the pitch offset for each note to a different interval — scatter them across the octave. Don't stress about which intervals to choose; Key Filter+ will fix anything that falls outside your scale.
- Probability: Set notes 1–4 to 100% probability. For the 5th note, lower the probability to around 50–70%. This means the chord's top voice won't always sound, creating natural variation in chord density.
Step 3 — Add Key Filter+ to Lock Everything to a Scale {#step-3}
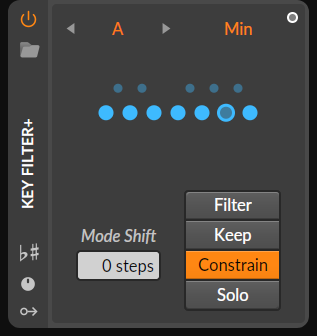
Add Key Filter+ to the note effects chain, after Multi Note.
Set it to your chosen key and scale — for this tutorial, we're using A Minor. Now, no matter what pitch offset Multi Note generates, every note will snap to the nearest note in A Minor. This is what lets us throw random intervals at the system without any wrong notes.
Step 4 — Create the MIDI Clip {#step-4}
Create a 4-bar MIDI clip on the pad track. Draw in a few notes — the exact pitches don't matter much since Key Filter+ will constrain them to A Minor anyway. The notes act as triggers for Multi Note.
Space the notes out to give each chord room to breathe. Loop the clip. At this point, you'll hear the pad playing the same chord each time — that's about to change.
Step 5 — Add Random Modulators for Generative Chord Variation {#step-5}
This is where the magic happens. Right now, Multi Note plays the same chord every time because the pitch offsets are static. We're going to modulate each note's pitch offset independently with a Random modulator.
Configure the Random Modulator
- Add a Random modulator to the track.
- Set the trigger mode to Note.
- Set the time base to Hold — this tells it to generate a new random value each time a note comes in, and hold that value until the next note. This is critical: you want the chord to be stable while it rings, but different on the next trigger.
Map It to Multi Note
Click the small blue arrow on the Random modulator to enter mapping mode (the arrow will start blinking). Click the pitch offset of Note 1 inside Multi Note. Set the modulation amount to somewhere between 3 and 6 semitones — enough to meaningfully shift the interval without making things chaotic. Click the arrow again to exit mapping mode.
Copy for All Five Notes
Duplicate the Random modulator four more times — you need one per note. Map each modulator to the pitch offset of its corresponding note in Multi Note. Each modulator should be independent, so each note of the chord gets its own random value on every trigger.
Enable Bipolar Mode on Some Modulators
Some of the Random modulators can be switched to bipolar mode (click the +/− toggle on the modulator). Unipolar modulators only push the pitch up; bipolar ones push both up and down. Mixing the two across your five-note slots generates a wider range of chord voicings and inversions.
Step 6 — Extend the Notes and Verify Output {#step-6}
Go back into the MIDI clip and lengthen the notes so chords ring out fully before the next trigger. For ambient music, long sustained chords feel much more natural than short stabs.
To confirm the system is working as intended, create a new MIDI track and set its input to receive MIDI from the chord generator track. Arm it for recording and let it run for a few bars — you'll see the actual generated chords being written in. This is a great way to check the spread of the voicings and spot if any intervals feel too jarring.
Step 7 — Build the Auto-Arpeggiated Melody Layer {#step-7}
Now let's add a second layer that takes the generated chords and arpeggiates them into an evolving melodic line — completely automatically.
New Track and Synth
Create a new instrument track. Load Polymer again, but this time browse the presets and choose something with a plucky or melodic character — short attack, some brightness — to contrast against the sustained pad.
Set this track's MIDI input to receive from the chord generator track (Track 1). This is important: this track will play whatever notes Track 1 outputs in real time.
Add the Arpeggiator
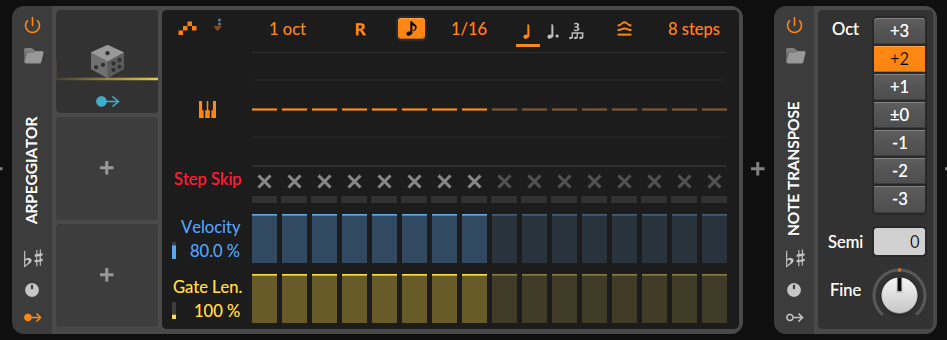
Insert the Arpeggiator device in the note effects chain, before Polymer. Configure it to your taste — try a 1/8 or 1/16 note rate for a busy melodic line, or 1/4 for something more sparse.
Don't forget to keep this track armed for recording — without this, the track won't process and play the incoming notes.
Randomize the Arpeggio Pattern
To keep the melody from feeling repetitive, add a Random modulator and map it to the Pattern parameter inside the Arpeggiator. Set the modulator's length to 1 bar so the arpeggio pattern shifts with every bar. Now the melodic order of notes changes continuously, keeping the loop fresh over time.
Add Note Transpose
Add a Note Transpose device after the Arpeggiator and use it to shift the melody up or down by an octave to find the sweet spot in the frequency range. The plucky melody usually sits best an octave or two above the pad.
The Full Signal Chain
Here's how everything connects:
MIDI Clip  →  Multi Note  →  Key Filter+  →  Polymer (pad)
                ↓ (MIDI out)
         Track 2: Arpeggiator  →  Note Transpose  →  Polymer (pluck)
each loop subtly
Random modulators on Multi Note's pitch offsets ensure every chord trigger is unique. A separate Random modulator on the Arpeggiator's Pattern parameter ensures the melodic interpretation of those chords shifts every bar.
Tips for Taking It Further
- Swap the scale in Key Filter+ at any time — same patch, totally different mood. Try Dorian or Phrygian for darker or more cinematic feels.
- Layer multiple chord generator tracks in different registers — low, mid, high — each with slightly different probability settings.
- Automate the Reverb mix over the course of a track to swell in and out of dense, spatial moments.
- Record the output of the chord generator to MIDI and use a favourite section as a fixed arrangement element.
- Try the Ether Harmony app if you want a dedicated tool for generative ambient chord work that pairs well with this Bitwig setup: shop.etherloops.com
Wrapping Up
In about 15 minutes of patch building, you've created a fully self-running generative ambient system: chords that are always in key, always different, and a melody layer that continuously reinvents itself from those chords. The whole thing runs from a single looping MIDI clip — a single note trigger, in fact — and it never repeats the same sequence twice.
This is one of the most satisfying things about working in Bitwig: the modular approach means you can wire random variation into almost any parameter and let the system do the composing for you.
If you have questions or want to share what you built with this patch, drop a comment on the YouTube video or reach out at etherloops@gmail.com.
Subscribe to EtherLoops for more ambient music production, Bitwig tutorials, generative MIDI workflows, and sound design ideas. 🎛️
Related: Check out the Ether Harmony app — a companion tool for generative ambient music designed to work alongside Bitwig and other DAWs.