How to Build an Evolving Ambient Loop in Bitwig Studio Using Only Native Tools (Beginner Tutorial)
A beginner-friendly, step-by-step guide to building a full evolving ambient loop in Bitwig Studio — pad, bass, sequence, and beat — using only Bitwig's native devices. No third-party plugins.

In this beginner-friendly Bitwig Studio tutorial, you'll build a short, evolving ambient loop completely from scratch — using nothing but the native tools and plugins that ship with Bitwig. No third-party plugins, just everything Bitwig gives you right out of the box.
Ambient music is one of the best places to start if you're new to sound design. There's no race to a drop, no complicated arrangement — just texture, space and slow movement. And the great news is that Bitwig Studio gives you everything you need to make it, straight out of the box.
In this guide we'll build a complete loop layer by layer: a rich pad, a smooth bass, a plucky sequence, and a full beat — plus a subtle squelch effect to keep things alive. Everything stays "in the box" with Bitwig's stock devices.
▶ Watch the full video tutorial:
What You'll Build
- A lush, layered pad using an Instrument Layer with three Polymer synths
- A smooth, monophonic bass with glide
- A bright, plucky sequence that sits on top of the pad
- A full beat built from Bitwig's native synthetic drums
- A subtle squelch sound effect for movement and surprise
Everything below uses only Bitwig native devices — no third-party plugins required. That makes this a perfect project if you're new to Bitwig Studio, ambient production, Polymer, or sound design with stock devices.
Step 1: Start With a Clean Slate
Open Bitwig and delete all the existing tracks so you're starting from a completely empty project. Select everything in the arrangement and clear it out. A blank canvas keeps things simple and makes it easy to follow along.
Step 2: Build the Pad With Polymer
There's a common myth that you can't make rich, complex pads in Bitwig using only the internal tools. We're going to break that perception — without diving into the Grid. Instead, we'll use an Instrument Layer, which keeps things approachable for beginners.
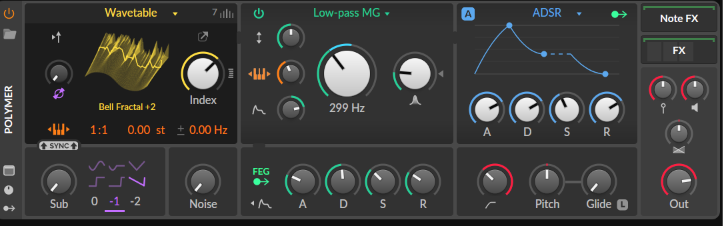
Start by inserting an instance of Polymer, Bitwig's flexible modular-style synth. This is the foundation for our pad.
- Choose the oscillator: Inside Polymer, select Wavetable, then pick the wavetable named Bell Fractal +2.
- Find a position: Use the index knob to find a nice spot in the wavetable.
- Shape the envelope: Set the ADSR to a typical pad shape — longer attack, longer decay, longer release. Switch off the sub oscillator since we don't need it here.
- Add movement: Increase the influence of the Filter Envelope so the envelope sweeps the filter over time.
- Make it wide: Raise the number of unison voices for a fuller, lusher sound, then reduce the detune slightly so the voices blend smoothly instead of sounding wobbly.
Add Gentle Motion With an LFO
Bring the pad to life by modulating the filter. Add a Classic LFO, set it to a very slow rate, make it unipolar (so it only sweeps in one direction), and assign it to the filter position. Now the filter slowly drifts on its own.
Open It Up With Stock Effects
Add these native effects in order:
- Chorus+ for width and a gentle shimmer
- Delay+ in ping-pong mode so echoes bounce between left and right
- Convolution reverb for a big, immersive sense of space
Step 3: Turn It Into a Layered Pad
Now we'll stack layers for a deeper sound. Click the left-most sidebar of the Polymer device to select it, then press Ctrl + G (or Cmd + G on Mac). This wraps the synth inside an Instrument Layer — a container where you can stack as many synths as you like, all playing together.
Layer 2: Add another Polymer with the Wavetable oscillator. This time, try your own wavetable — just drag a wavetable file from your disk straight onto the oscillator area and Bitwig loads it instantly. Set a pad-friendly ADSR, switch off the sub, add some Filter Envelope movement, and thicken it with unison voices. Add Delay+ and Convolution reverb to blend it with the first layer.
Layer 3: Add one more Polymer with another wavetable — yours or a Bitwig factory one. Each layer adds its own color, and together they combine into one big, rich, evolving pad.
Beginner tip: You don't have to use the exact wavetables shown in the video. Browse Bitwig's factory wavetables and pick whatever catches your ear — the technique is what matters.
Step 4: Add the Bass
Give the loop a foundation with a bass layer. Use Polymer again — no need to overcomplicate it.
In Polymer's properties panel on the left, drag the number of voices down to zero to make the synth monophonic (one note at a time). This also emphasizes the glide for smooth, sliding transitions between notes. Increase the voice stacking to make the bass richer, fuller and stronger.
Step 5: Generate Chords and Bass With Track Builder
To create the MIDI for the pad and bass quickly, I use my own app, Track Builder. It lets you come up with chord progressions and bass lines fast, then export them as MIDI straight into Bitwig.
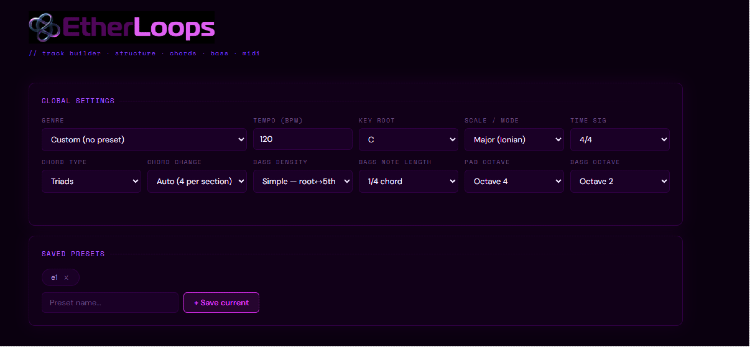
Choose your genre, tempo, key, and scale, set the chord and bass parameters, then export everything as MIDI files. Drag the pad MIDI onto your pad track and the bass MIDI onto your bass track — and your instruments come to life with real chords and a bass line.
Edit the Notes for a Fuller Sound
Open the pad clip and stretch some notes so they overlap and sustain into one another, rather than leaving gaps. This keeps the pad continuous and lush, giving the whole loop that smooth, seamless flow.
Step 6: Add a Plucky Sequence
Add a new track with another Polymer, this time designing a plucky sound: a short, snappy envelope with a fast attack and quick decay. These bright little points of movement contrast nicely with the slow, washy pad underneath.
Add a free-running, unipolar Classic LFO at a slow rate to drift the filter independently — it isn't tied to tempo or retriggered by each note, so the tone shifts organically across the loop.
Draw a short, repeating pattern of notes that fits your key and scale. Keep it short so it cycles round and round. Then add a ping-pong delay and a reverb to give the plucks rhythm and space.
Step 7: Build the Beat With Drum Machine
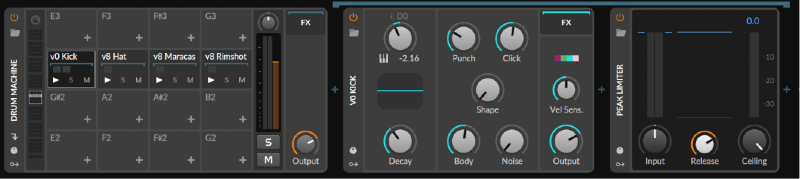
Add rhythm and structure using Bitwig's Drum Machine, which loads individual drum sounds onto separate pads. We'll keep everything in the box with Bitwig's synthetic drum instruments — no samples needed.
- Kick — V-Zero Kick: punchy with plenty of low-end weight. Add a Peak Limiter to keep the audio clean and clipping-free.
- Hi-hat — V8 Hat: tweak it to a short, crispy sound that sits cleanly in the mix.
- Maracas — V8 Maracas: a longer, shaker-style sound for texture. Add an EQ to bring out the higher frequencies.
- Rimshot — V8 Rimshot: a sharp, snappy accent to tie the rhythm together.
Add Groove With Repeats and Probability
Put together a MIDI sequence for the beat, then add two beginner-friendly touches:
- Hi-hat repeats: Select one note, open the properties panel on the left, and drag the number of repeats up to around four. This creates a quick, rolling hi-hat.
- Probability: Select all the hi-hat notes and lower their probability a little, so not every note plays every time. The beat stays natural and less repetitive on each loop.
Step 8: Finish With a Squelch Effect
The final touch is a subtle squelch sound effect. We designed this exact sound in a previous tutorial — watch the squelch design video here.
Create a short MIDI clip with two notes: a high note (brighter, quicker) and a low note (a slow, evolving squelch). Set a fairly low probability for both so they only appear now and then — a subtle surprise rather than something on every loop.
That's Your Loop
You've now built a complete, evolving ambient loop in Bitwig Studio — pad, bass, sequence, and beat — using only native tools. From here, you can keep layering, automate parameters, or arrange it into a full track.
Tools and Apps Used in This Tutorial
- Ether Harmony app — https://shop.etherloops.com/b/Dm2tb
- Track Builder app — https://shop.etherloops.com/b/J9WoD
- Squelch sound design tutorial — https://youtu.be/hJOx6OIc2Tw
- Website: https://www.etherloops.com
- Contact: etherloops@gmail.com
Frequently Asked Questions
Do I need any third-party plugins for this? No. Everything in this tutorial uses Bitwig Studio's native devices — Polymer, Instrument Layers, the Classic LFO, Chorus+, Delay+, Convolution reverb, Drum Machine and the V-series synthetic drums.
Is this suitable for beginners? Yes. We avoid the Grid and complex patching, and instead use approachable tools like Instrument Layers and Polymer so beginners can follow along.
Which Bitwig version do I need? Any recent version of Bitwig Studio that includes Polymer and the V-series drums will work. The techniques are version-agnostic.
Can I use my own sounds? Absolutely. You can drag in your own wavetables, or use any of Bitwig's factory wavetables and drum sounds. The workflow stays the same.